Need more help with Japanese vocabulary about post offices in Japan? In this cheat sheet, we have listed some common phrases and words for you to use there.
We have included terminology on how to send a Japanese postcard and deliveries.
There are various ways to which one can go about sending an overseas parcel from Japan. International package delivery is mainly split into four ways: EMS, Airmail, SAL and surface mail. Each delivery company is different based on its service and pricing.
Click here for more information more the different mailing methods.
It is important to thank the service staff for helping you by a simple “Arigato gozaimasu (Thank you)” or “Otsukaresama deshita (Thank you for your hard work)“. This is a kind gesture to express gratitude for their efforts.
If you wish to have a short-term study in Tokyo, Check out our 3-month intensive Japanese courses. Also, feel free to send us an inquiry if you have any questions!
Start taking Japanese lessons and master these terminology today!
Need more help with Japanese vocabulary about post offices in Japan? In this cheat sheet, we have listed some common phrases and words for you to use there.
Japan has one of the best postal services in the world, and there are approximately 24,000 post offices in Japan. Post offices in Japan also offer financial services such as banking and insurancethat allow the withdrawal of money using a foreign-issued credit card or cash card.
Japanese post offices are open Monday-Friday 9 am–5 pm for mail and Monday-Friday 9 am–4 pm for other services.
Japanese vocabulary can be difficult to learn, but practice makes perfect. This is part one of the cheat sheet for the Japanese post office vocabulary, so make sure you follow up for part two.
Japanese Post Office Vocabulary Sentence Examples
Here is how you form basic sentences with the terminology:
Example 1:
ゆうじんにはがきをおくるためにゆうびんきょくにいきました。
yūjin ni hagaki wo okuru tame ni yūbinkyoku ni ikimashita.
I went to the post office to send my friend a postcard.
Example 2:
こづつみがとどいたときにはいえにいなかったため、ゆうびんポストにふざいひょうがとどいてました。
kozutsumi ga todoita toki ni ie ni inakatta tame, yūbin posuto ni fuzaihyō ga todoitemashita.
I was not home when my parcel arrived, so a delivery notice was delivered to my mail box.
Japanese Post Office Vocabulary –
Japanese
Pronunciation
Meaning
ゆうびんきょく
yūbinkyoku
Post Office
ポスト
posuto
Mailbox
ふうとう
fūtō
Envelope
はがき
hagaki
Postcard
こづつみ
kozutsumi
Parcel
てがみ
tegami
Letter
いんさつぶつ
insatsubutsu
Printed matter
かきとめ
kakitome
Registered mail
こうくうびん
kōkūbin
Air mail
ふなびん
funabin
Sea mail
ふざいひょう
fuzaihyō
Delivery notice
にもつ
nimotsu
Package
そうりょう
sōryō
Shipping fee
われもの
waremono
Fragile
If you wish to have a short-term study in Tokyo, Check out our 3-month intensive Japanese courses. Also, feel free to send us an inquiry if you have any questions!
Start taking Japanese lessons and master these terminology today!
If you are a new resident to Japan – visiting the Tokyo Regional Immigration Bureau (東京入国管理局) / (Tokyo Immigration Office) is likely something that you will have to do.
In this blog post we hope to answer some of the most frequently asked questions about Immigration in Tokyo and to give you vocabulary that you will need while visiting.
Useful Vocabulary for the Tokyo Immigration Office
Certificate of Eligibility (CoE) –Zairyu Shikaku Nintei Shomeisho – (在留資格認定証明書)
Application for Extension of Period of Stay – Zairyū kikan kōshin kyoka shinsei-sho – (在留期間更新許可申請書)
Application for Change of Status of Residence – Zairyū shikaku henkō kyoka shinsei-sho – (在留資格変更許可申請書)
Application for Permanent Residence – Eijū kyoka shinsei-sho – (永住許可申請書)
Apply for a visa. – Biza o toru – (ビザをとる)
For a Japanese visa to expire – Biza ga kireru – (ビザが切れる)
To update your visa – Biza o koshin suru – (ビザを更新する)
To apply for your visa – Biza o shinseisuru – (ビザを申請する)
Period of Extension – Kikan o encho suru – (期間を延長する)
You may need to ask your manager to take a half-day off when you visit the Tokyo Immigration Office. The Tokyo Regional Immigration Bureau is only open Weekdays during regular business hours. This means that you will have to leave work or take time off.
Here is an example dialogue that will teach you how to ask your manager in Japanese for a half-day off to visit Immigration.
Example Dialogue – (While at work speaking with a colleague about the Immigration Office):
A:もうすぐビザが切れちゃうから、また入管に更新に行かないといけない。 Mōsugu biza ga kire chaukara, mata nyūkan ni kōshin ni ikanaito ikenai.
My visa will expire soon – so I will have to visit immigration to update it.
B: じゃあ、部長に言って半休とった方がいいよ。すごく込むから朝早く行った方がいいって、ジョンさんが言ってた. Jā, buchō ni itte hankyū totta kata ga ī yo. Sugoku komukara asa hayaku itta ho ga ītte, Jon-san ga itteta.
Well then, you better ask your manager for half-day off. John was saying that its better to get there really early because it gets very crowded.
A: うん、そうする。部長になんて言ったらいいかな。 Un,-sō suru. Buchō ni nante ittara ī ka na.
I will do that. What is the best way to ask the director?
B: 「すみません、入管にビザ更新の手続きをしに行かないといけないので、来週半休をいただいてもいいでしょうか。」 Sumimasen, nyūkan ni biza kōshin no tetsudzuki o shi ni ikanaito ikenainode, raishū hankyū o itadaite mo īdeshou ka.
“I’m sorry I have to visit the immigration office to apply for a visa renewal, so may I have a half-day off next week?”
A: ありがとう! Arigatou!
Thanks!
F.A.Q. Tokyo Regional Immigration Bureau
Where is the Tokyo Immigration Office?
(東京入国管理局)
Tokyo Regional Immigration Bureau
5 Chome-5-30 Kōnan, Minato-ku, Tōkyō-to 108-8255
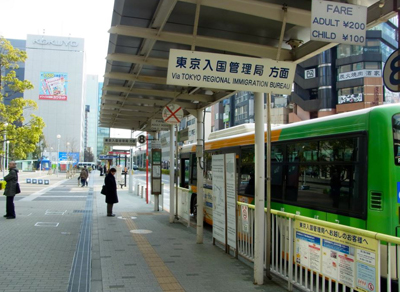
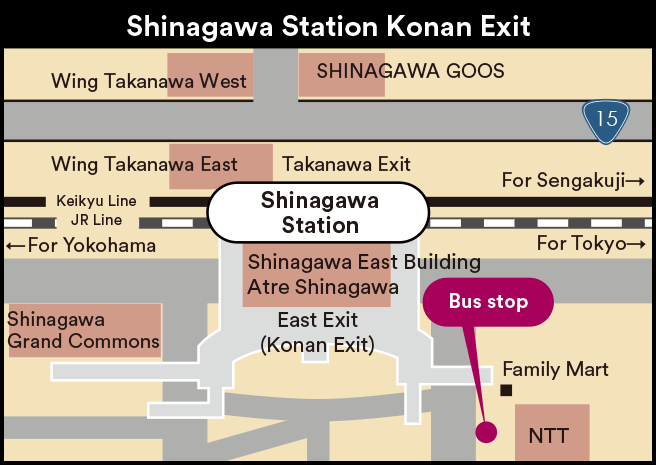
Tokyo Regional Immigration Bureau is located in Konan – and is most easily accessible by Bus from the Konan exit of Shinagawa station. Once you exit from the Konan Side – passing Atre, you will see marked signs directing you to walk left on the elevated walkway and walk down the stairs to the
Where is the bus stop at Shinagawa (品川) Station?
The Tokyo Regional Immigration Bureau Bus is the #8 bus – which can be found by going left on the walkway and taking the stairs down in-front of the family mart from the Konan (East) exit of Shinagawa (品川) Station. You can see how to get there from the image above – as well as the google map below – all of the blue bus icons are different stops and you will see the #8 bus marked as in the photo above.
What time should I arrive?
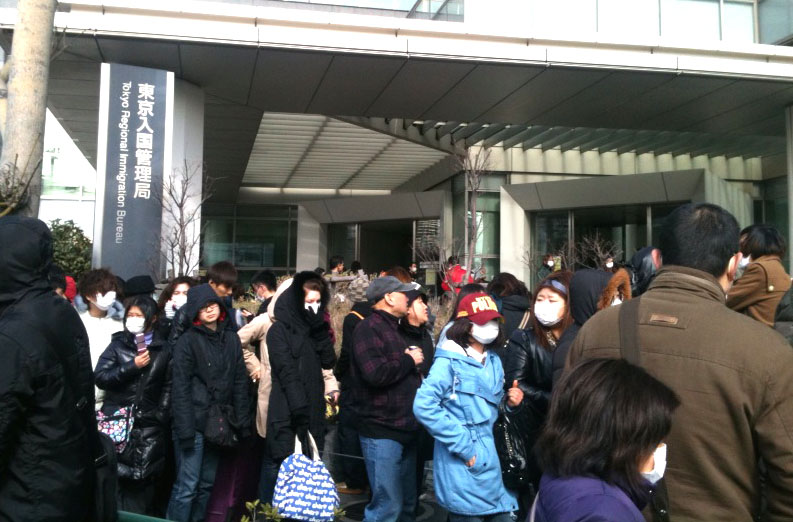
Tokyo Regional Immigration Bureau normally has a line of people waiting for it to open starting from 7:30 most mornings. Mondays and Fridays are especially busy due to it not being open on weekends.
The counters that accept applications for Visa Extensions and Certificate of Eligibility open from 8:30 and the Counters processing visa extensions open from 9:00. Applications are assigned a number and are handled on a first-come-first-serve basis.
Our advice would be to arrive early with all of your documents prepared – and wait outside in the line for early applications. In our experience If you receive a application number lower than 50 – you should not have to wait more than 1 hour to be processed. Line of lucky people waiting for Immigration to open.
What documents do I need for my Japanese Visa application?
We can’t give specific advice because it depends on what you are applying for but generally you will need the following:
Passport Photo (Taken within the past 3 months)
Filled Application Form (Varies based on application type)
Supporting Application Documents (Varies based on application type)
Food! 😉 There is a Family Mart on the first floor of the immigration center – but there is nothing surrounding it – meaning long lines and potentially missed call numbers for your application. We recommend that you bring some water and snacks with you so that you don’t have to wait in a long line at family mart. We would also recommend to bring something to read as wait times are unpredictable.
Are you a expat / foreign professional in Tokyo? Coto Japanese Academy helps many foreign professionals with their Japanese learning. Click below to learn more!
December and January are the busiest times for the Japanese post offices and it all come to one reason: the tradition of New Year‘s postcards (nengajo). And yes, it’s probably the biggest item on the calendar of annual events!
New Year wishes postcard: 年賀状
年賀状 is composed of year 年, congratulations 賀 and 状, meaning circumstances. With the New Year approaching, thoughts wanders towards families, relatives and close ones. The tradition is rooted in history, when people needed to let others, whom they did not often meet, that they were alright.
In spite of Japanese people’s love for smartphones, tablets, and computers, hand written 年賀状 remains a strong tradition. Of course, people can also buy the cards at stationaries or post offices, but making your own is a real pleasure and show how much you’ve thought about the person. Most of the printed postcards will have Chinese zodiac sign of the new year, along with conventional greetings.
Handling postcards the Japanese Way
年賀状 are a yearly challenge for Japanese post office. Indeed, they guarantee the delivery on January 1st for all postcards posted before the end of December. To accomplish such enormous task, special postboxes are installed. Afterwards, workers hired specially for the season will sort all the 年賀状. Postcards will be stored until New Year.
Check out our other blog posts on Japanese New Year:
You’re thinking of sending a 年賀状 to your Japanese friends? Doing your own 年賀状 is the perfect way to demonstrate your handwriting skills. Here a few greetings you could use.
今年もよろしくお願いします。I hope for your favor again in the coming year. This is also one of the ways in which you can wish others a Happy New Year!
(新年)あけましておめでとうございます。 Happiness to you on the dawn [of a New Year]
旧年中はお世話になりました。Thank you for everything you did last year.
ご健勝とご多幸をお祈り申し上げます。Wishing your family good health and happiness.
年始のご挨拶を申し上げます。A New Year’s greeting to you.
We’ve compiled a few greetings words, called 賀詞, suitable for friendly relations. Keep in mind not to use them when you’re writing to your boss or elder.
謹賀新年 Happy New Year
賀正 Happy New Year
初春 Early spring
迎春 Welcome spring
A Last Word
Traditions don’t come without rules. Japanese have better be careful with their address book as one should never send a 年賀状 to someone who lost a family member over the past year. To avoid an impair, the family of the deceased will have to send a mourning card, 喪中葉 to let friends and relatives know not to send a greetings card.
Check out our other blog posts on Japanese New Year:
Coto Japanese Academy is a unique Japanese Language School in Iidabashi Tokyo, we offer relaxed and fun conversational lessons for all levels of Japanese learner. Coto Japanese Academy prides itself on its community atmosphere and fun lessons that focus on creation of opportunities to speak and learn Japanese. If you are interested in studying Japanese in Tokyo – please visit our contact page here.
Many challenges await expatriates in Japan. The small actions of daily life may become mountains to cross, and one of them is dealing with the Japanese post office. Sending a letter might not be difficult, but sending a package can prove to be quite challenging.
Did you know that the Japanese postal system is said to be one of the best in the world? With some information, you will have no problem going to the post office! So let’s learn how to send a package in Japanese!
First of all, let’s check all the types of international mail:
– Surface mail
– Air mail
– SAL (Surface Air Lifted) mail
– EMS
* EMS also includes a pickup service.
The post office serves two major functions (the first being mail and the second being savings and insurance), so be sure to go to the correct service counter. Generally, the first thing you do at the postal office is pick up a numbered ticket at one of the two counters. Use the signs, red for mail and green for savings and insurance, to find the right counter.
Kanji for use at the counters:
郵便 Mail
切手 stamp
貯金 savings
保険 insurance
The invoice includes both Japanese and English, allowing you to fill out the forms in English.
Customer: Kore o Austria made okuritain desu ga.
Post office clerk: Koukuu bin de iidesu ka?
Customer: Dono gurai kakarimasu ka?
Post office clerk: Itsuka gurai desu ne. EMS dato futsu ka de ikimasu yo.
Customer: EMS tte nan desuka?
Post office clerk: Kokusai supiido yuubin to itte, ichiban hayain desu.
Customer: Ikura desu ka?
Post office clerk: EMS dato nisen-happyaku yen, airmail dato sen-happyaku -rokuyuu yen desu.
Customer: Takai desune. Motto yasuku okuritain desu ga.
Post office clerk: SAL bin dato sen-hachiyuu yen desuga, ni-shuu kan gurai kakarimasu.
Customer: Sou desuka. Jaa, koukuu-bin ni shimasu.
Post office clerk: Soredewa kochira no youshi ni hitsuyou jikou o gokinyuu kudasai.
Customer: Eigo de iidesuka?
Post office clerk: Hai, daijyoubu desu.
Customer: I would like to send this to Australia.
Post office clerk: Would airmail be okay?
Customer: How long does it take?
Post office clerk: About five days. It will be there in two days if you use EMS.
Customer: What is EMS?
Post office clerk: It means “Express Mail Service,” and it’s the fastest.
Customer: How much does it cost?
Post office clerk: EMS would be ¥2,800, and airmail would be ¥1,860.
Customer: That’s expensive. I’d like to send it more cheaply.
Post office clerk: SAL mail would be ¥1,080, but it will take about two weeks.
Customer: Is that so? Then I’ll go with airmail.
Post office clerk: Alright, please fill in the required details on this form.
Customer: Is English okay?
Post office clerk: Yes, that would be fine.
Vocabulary & Useful Phrases
航空便 (Kou kuu bin): Air mail
どのぐらいかかりますか (Dono gurai kakari masu ka)? : How long does it take?
___ってなんですか (____tte nan desu ka)? : What is ___?
____だと (A dato…, B dato…): A would be …, and B would be …
もっと安く/早く送りたいんですが (Motto yasuku/ hayaku okuritain desu ga): I’d like to send it more cheaply/quickly
___にします (A ni shimasu): I’ll go with A
用紙 (Youshi): Form
必要事項 (Hitsuyou jikou): Required details
ご記入ください (Go kinyuu kudasai): Please fill out/in
___でいいですか (___de iidesu ka?) : Is ___ okay?
Be careful, you may be forbidden to send things such as food, snacks etc. depending on the country. You can check this directly online.
If you are looking to find a post office near you, here’s how you can ask for directions or check with passers-by as to whether if there is any near you!
Credit CC BY 2.0: nambon
Title: 神宮前六郵便局 source: Flickr
For: How to send a package in Japanese
Coto Japanese Academy is a unique Japanese Language School in Iidabashi Tokyo, we offer relaxed and fun conversational lessons for all levels of Japanese learner. Coto Japanese Academy prides itself on its community atmosphere and fun lessons that focus on creation of opportunities to speak and learn Japanese. If you are interested in studying Japanese in Tokyo – please visit our contact page here.
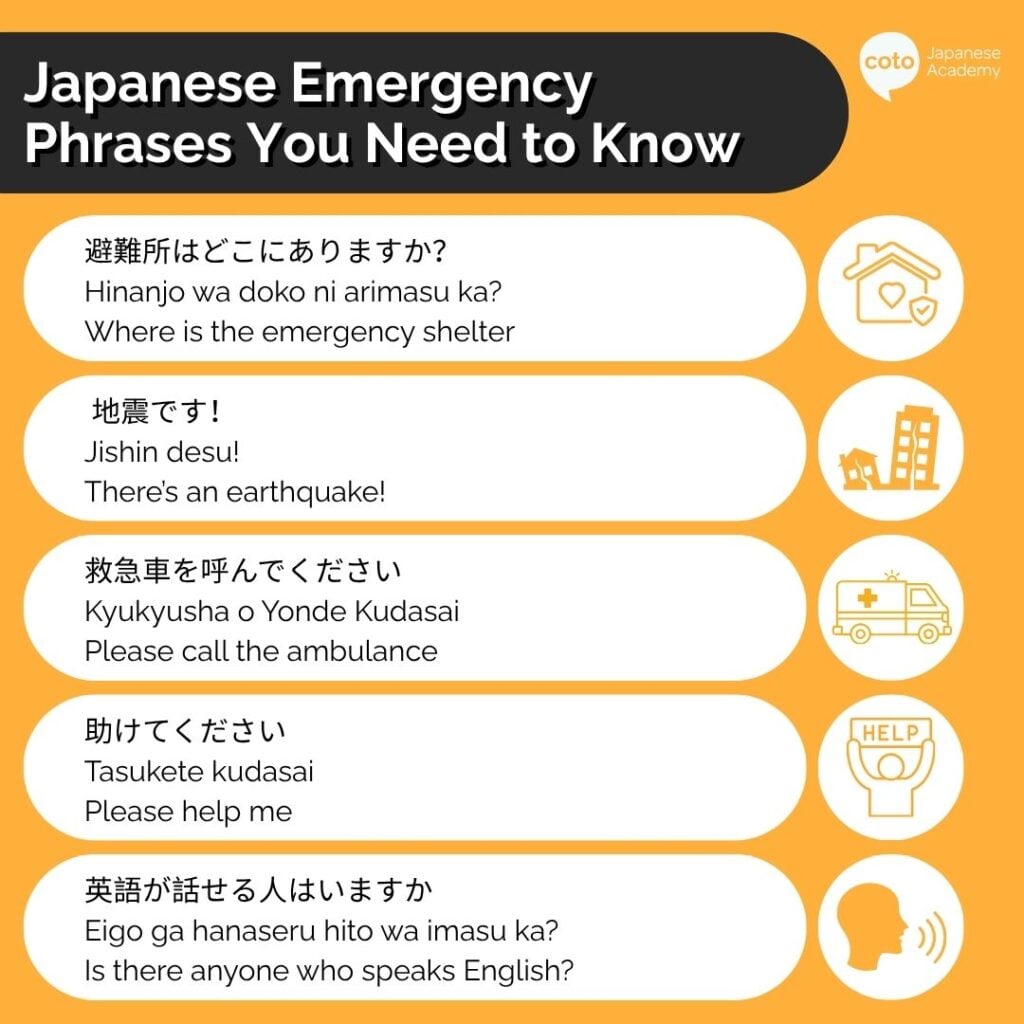
While Japan is known to be one of the safest countries in the world, it is also a very natural disaster-prone country. In fact, according to Statistica, the country experiences 1,500 earthquakes each year. When you’re in Japan and an unfortunate event occurs, what Japanese phrases should you know to ask for help or find out how to get to safety? Whether you are visiting Japan or living here, it’s essential to know some key words and phrases for different emergency situations such as disasters, accidents, or injuries.
Hopefully you never have to deal with anything too serious, but it’s always best to be prepared! So, let’s go over some essential phrases to help you stay prepared and ensure you understand how to communicate during emergencies.
Japanese Emergency Phrases for Disasters
Disasters, such as earthquakes or tsunamis, are quite frequent in Japan. Although most are rather small, there is a chance that they may require you to evacuate your home. But don’t worry, Japan has been dealing with disasters for years, so they are very well equipped.
But there are some words and phrases you should know to ensure you understand directions and communicate with public service staff.
1. ここはどこですか? (Koko wa doko desuka?): Where Are We Right Now?
If you’re somewhere in public and hear that there is a risk of a disaster such as an earthquake, it’s always good to know exactly where you are, especially if you’re not sure. どこ (Doko), meaning “where,” is perfect for asking where you are or where you should go.
Example:
ここはどこですか? Koko wa doko desuka? Where are we right now?
2. ここは安全ですか?(Koko wa anzen desu ka?): Is it safe here?
The word 安全 (anzen) means “safe” and, as you can imagine, is one of the first phrases you should know in an emergency. You can use it to ask if you’re in a safe area or where you can go for safety.
Here is an example of how to ask about safety in Japanese.
Example:
ここは安全ですか?どこに行けばいいですか? Koko wa anzen desuka? Doko ni ikeba iidesuka? Is it safe here? Where should we go?
3. 地震がきますか?(jishin ga kimasuka?): Will There be an Earthquake?
Earthquakes are common in Japan, but it’s worth asking whether one will come soon, especially a big one. 地震 (jishin) is the word for “earthquake” in Japanese and is what you hear when your phone’s earthquake alarm goes off.
Usually, a few moments before an earthquake, the Japan Meteorological Agency (JMA)’s Earthquake Early Warning system sends an alert to every phone bought in Japan, with some exceptions. It includes an alarm with a voice saying 地震です (jishin desu), or “There’s an Earthquake.”
While the alarm is designed to catch your attention and prompt swift action, the earthquake itself isn’t always large and may last only seconds. But whenever you do hear it, be somewhere safe and take proper precautions to avoid things that could fall on you.
Example:
大きな地震がきますか? Ookina jishin ga kimasu ka? Is a big earthquake coming?
4. 避難所はどこにありますか? (Hinanjo wa doko ni arimasu ka?): Where is the Emergency Shelter
Sometimes disasters, particularly tsunamis and typhoons, cause flooding, strong winds, and rain that can affect your area. In these cases, you would need to evacuate to the closest evacuation facility.
In many neighborhoods, the local public school building is often used as the emergency shelter. This is because most schools are built to be as safe as possible to prioritize children, and because you find schools in just about every neighborhood.
So if you’re not sure where your nearest evacuation shelter is, here is how you can ask.
Example:
すみません、避難所はどこですか? Sumimasen, hinanjo wa dokodesuka? Excuse me, where is the evacuation center?
5. どうしたら〜に行けますか? (Doushitara ~ni Ikemasuka?): How Can I Get to…?
Once you know where you need to go during a disaster, you might want to know how you can even get there. Train lines might stop running, and roads could be blocked off. So, it’s definitely worth asking how to get somewhere safe, like an evacuation center.
You can use this phrase どうしたら (doushitara) or どうやて (douyate), which both mean “how” or “how to…”, followed by the place you want to go to and 行けますか (ikemasuka), meaning “can go.” This is the potential form of 行く(iku), or “to go.” The whole expression asks how you can get to place A.
Example:
どうしたら避難所に行けますか? Doushitara hinanjo ni ikemasuka? How can I go to the evacuation center?
6. 火事です!(Kaji desu): Fire!
Knowing how to understand or say the word “fire” should be on your list of essential Japanese survival words. While 火 (hi) is a more literal word for “fire,” 火事 (kaji) better describes a destructive accidental fire. So, in the context of a “disaster fire,” you would hear and use the word 火事; however, a more formal word that often appears in writing is 火災 (kasai).
Example:
火事です!みんなさん避難してください! Kaji desu! Minna san hinan shite kudasai! There’s a fire! Everyone, please evacuate!
English
Japanese
Furigana
Romaji
Earthquake
地震
じしん
jishin
Aftershock
余震
よしん
yoshin
Tsunami
津波
つなみ
tsunami
Typhoon
台風
たいふう
taifuu
Heavy rain
大雨
おおあめ
ooame
Flood
洪水
こうずい
kouzui
Landslide
土砂崩れ
どしゃくずれ
doshakuzure
Volcanic eruption
噴火
ふんか
funka
Fire
火事
かじ
kaji
Fire (formal)
火災
かさい
kasai
Disaster
災害
さいがい
saigai
Evacuation
避難
ひなん
hinan
Evacuation shelter
避難所
ひなんじょ
hinanjo
Emergency exit
非常口
ひじょうぐち
hijouguchi
Power outage
停電
ていでん
teiden
Water outage
断水
だんすい
dansui
Flashlight
懐中電灯
かいちゅうでんとう
kaichuu dentou
Emergency supplies
防災グッズ
ぼうさいぐっず
bousai guzzu
Warning
警報
けいほう
keihou
Safe
安全
あんぜん
anzen
Japanese Emergency Phrases for Hospital Visits
There are many reasons why you might need to visit a hospital in Japan, but this list will only focus on emergency scenarios. So, let’s discover what phrases you should know for medical emergencies.
7. 救急車を呼んでください (Kyukyusha o Yonde Kudasai): Please Call the Ambulance
If you or someone gets badly injured or seems really unwell, ask someone nearby to call an ambulance. If you’re in a public area or business, it may be best to ask the staff to call, since they already know the address and other details to help the ambulance or emergency services get to your destination.
So this is a very useful expression to remember just in case.
Example:
救急車を呼んでください!友達はケガしている! Kyuukyuusha o yonde kudasai! Tomodachi wa kega shiteiru. Please call an ambulance! My friend is injured!
8. 病院はどこですか? (Byouin wa doko desuka?)
If you ever get a concerning illness or injury, you should visit the hospital as soon as possible. The good news is Japan has hospitals everywhere, so there’s likely one close by. The word for hospital in Japanese is 病院 (Byouin), where you can go for specific check-ups or serious emergencies.
However, if you just need a check-up for a prescription for medicine to treat symptoms like fever, bacterial infection, or allergies, you can go to a clinic, クリニック (kurinikku), instead. Of course, for emergency medical attention, a hospital will be much better equipped. So, to find the nearest hospital, here is how you can ask.
Example:
一番近くの病院はどこですか? Ichi ban chikakuno byouin wa doko desuka? Where is the closest hospital?
Now, how do you describe your injury to the doctor? You can simply point to the affected area and say ここが痛いです (koko ga itai desu), meaning “it hurts here,” or ここがけがしています (koko ga kega shite imasu), meaning “I’m injured here.”
You can also mention the specific area that’s experiencing pain; just replace ここ(here) with the body part that’s hurt or injured.
Example:
足首を怪我しています。 Ashikubi o kega shite imasu. I injured my ankle.
English
Japanese
Furigana
Romaji
Hospital
病院
びょういん
byouin
Ambulance
救急車
きゅうきゅうしゃ
kyuukyuusha
Emergency room
救急外来
きゅうきゅうがいらい
kyuukyuu gairai
Doctor
医者
いしゃ
isha
Nurse
看護師
かんごし
kangoshi
To get injured
怪我する
けがする
kega suru
Sick / illness
病気
びょうき
byouki
Pain / hurts
痛い
いたい
itai
Sprain
捻挫
ねんざ
nenza
Bleeding
出血
しゅっけつ
shukketsu
Broken bone
骨折
こっせつ
kossetsu
Burn
火傷
やけど
yakedo
Fever
熱
ねつ
netsu
Headache
頭痛
ずつう
zutsuu
Stomachache
腹痛
ふくつう
fukutsuu
Dizziness
めまい
めまい
memai
Nausea
吐き気
はきけ
hakike
Difficulty breathing
呼吸困難
こきゅうこんなん
kokyuu konnan
Unconscious
意識がない
いしきがない
ishiki ga nai
Allergy
アレルギー
あれるぎー
arerugii
Serious allergic reaction (anaphylaxis)
アナフィラキシー
あなふぃらきしー
anafirakishii
Medicine
薬
くすり
kusuri
Pharmacy
薬局
やっきょく
yakkyoku
Health insurance card
保険証
ほけんしょう
hokenshou
Medical examination
診察
しんさつ
shinsatsu
Surgery
手術
しゅじゅつ
shujutsu
Hospital admission
入院
にゅういん
nyuuin
Japanese Emergency Phrases for Accidents & Crimes
Accidents and crimes happen; fingers crossed they don’t happen to us, but it never hurts to know what to say when they do. So, here are some emergency phrases you can use for cases when you need to yell for help or talk to the police.
10. 助けてください (tasukete kudasai): Please Help Me
This is probably one of the most essential phrases to know for safety. If you ever need to ask for help, whether it’s because of an accident, injury, or someone endangering you, you can say 助けて (tasukete), meaning “help!” It conveys the same meaning and urgency as in English, so it works in almost any emergency where you need immediate help.
Example:
誰か助けてください! Dareka tasukete kudasai! Can someone please help?!
Example 2:
すぐに助けが必要なんです! Sugu ni tasuke ga hitsuyuu nandesu! I need help immediately!
11. 警察を呼んでください (Keisatsu o yonde kudasai!) Please Call the Police!
If you’re a victim of a crime, witness something dangerous, or get into a serious accident, you’ll want the police involved quickly. 警察 (keisatsu) means “police,” and combined with 呼んでください (yonde kudasai), meaning “please call,” it’s a direct way to ask someone nearby to contact them for you. In Japan, the emergency number for the police is 110, so if you’re calling yourself, that’s the number to dial.
Like with calling an ambulance, if you’re in a shop, restaurant, or station, it’s often easiest to ask the staff, since they can explain the exact location.
Example:
警察を呼んでください!バッグを盗まれました! Keisatsu o yonde kudasai! Baggu o nusumaremashita! Please call the police! My bag was stolen!
12. 財布を盗まれました (Saifu o Nusumaremashita): My Wallet Was Stolen
Petty theft is relatively rare in Japan, but it can still happen, especially in crowded places like trains or tourist areas. The key word here is 盗まれました (nusumaremashita), the passive past form of 盗む (nusumu), meaning “to steal.” Using the passive form tells the listener that something was stolen from you. You can swap 財布 (saifu), meaning “wallet,” with whatever was taken, like スマホ (sumaho), “smartphone,” or パスポート (pasupooto), “passport.”
If you simply lost something rather than having it stolen, use なくしました (nakushimashita), meaning “I lost it.”
Example:
電車で財布を盗まれました。 Densha de saifu o nusumaremashita. My wallet was stolen on the train.
13. 英語が話せる人はいますか? (Eigo ga hanaseru hito wa imasu ka?): Is There Anyone Who Speaks English?
If the situation is too stressful to explain in Japanese, don’t hesitate to ask for someone who can help in English. 話せる (hanaseru) is the potential form of 話す (hanasu), “to speak,” so the phrase literally asks whether someone can speak English. It works at police boxes, hospitals, and train stations, and many places have staff or interpreter services available.
You can also explain your situation honestly by saying 日本語があまり話せません (Nihongo ga amari hanasemasen), meaning “I can’t speak much Japanese.”
Example:
日本語があまり話せません。英語が話せる人はいますか? Nihongo ga amari hanasemasen. Eigo ga hanaseru hito wa imasu ka? I can’t speak much Japanese. Is there anyone who speaks English?
English
Japanese
Furigana
Romaji
Police
警察
けいさつ
keisatsu
Police box
交番
こうばん
kouban
Police station
警察署
けいさつしょ
keisatsusho
Accident
事故
じこ
jiko
Traffic accident
交通事故
こうつうじこ
koutsuu jiko
Danger / Dangerous
危ない
あぶない
abunai
Stop!
やめて
やめて
yamete
Thief
泥棒
どろぼう
dorobou
Theft
盗難
とうなん
tounan
Pickpocket
スリ
すり
suri
Robbery
強盗
ごうとう
goutou
Fraud / Scam
詐欺
さぎ
sagi
Groper (on trains)
痴漢
ちかん
chikan
Suspicious person
不審者
ふしんしゃ
fushinsha
To steal
盗む
ぬすむ
nusumu
To lose
なくす
なくす
nakusu
Lost item
落とし物
おとしもの
otoshimono
Victim
被害者
ひがいしゃ
higaisha
Witness
目撃者
もくげきしゃ
mokugekisha
Damage report (to police)
被害届
ひがいとどけ
higai todoke
Interpreter
通訳
つうやく
tsuuyaku
Passport
パスポート
ぱすぽーと
pasupooto
Wallet
財布
さいふ
saifu
Simulating an Emergency Call
You may need to call emergency services in Japan to request an ambulance, police, or fire department support. In Japan, dialing 119 reaches the local fire department, which dispatches ambulances or fire trucks based on the emergency. Dialing 110 reaches the police department, which will respond for immediate help if you are in danger.
So, let’s go through a typical call with a service operator:
オペレーター: 119番の消防ですが、火事ですか、救急ですか? Opereetaa: 119-Ban no shoubou desuga, kajidesu ka, kyuukyuu desuka? Operator: This is 119, Fire Department. Is it a fire or a medical emergency?
あなた: 救急です。 Anata: Kyuu kyuu desu. You: It’s a medical emergency.
オペレーター: 救急ですね。住所を教えてください。 Opereetaa: Kyuukyuudesu ne. Juusho o oshiete kudasai. Operator: Medical emergency. Please tell me your address.
あなた: 東京都渋谷区渋谷1丁目12-13郵便局の前です。 Anata: Toukyouto shibuya ku shibuya i choume juu ni – juu san yuubinkyoku no mae desu. You: Tokyo-to, Shibuya-ku, Shibuya 1-chome 12-13. In front of the post office.
オペレーター: 怪我ですか?病気ですか? Opereetaa: Kega desuka? Byouki desuka? Operator: Is it an injury or illness?
あなた: 病気です。人が倒れています。 Anata: Byouki desu. Hito ga taorete imasu. You: It’s an illness. Someone has collapsed.
オペレーター: わかりました。あと5分ほどで救急車が到着します。 Opereetaa: Wakarimashita. Ato 5-bu hodo de kyūkyūsha ga tōchaku shimasu. Operator: Understood. The ambulance will arrive in about 5 minutes.
Remember Some of These Japanese Emergency Phrases Just in Case!
While we all hope never to face an emergency, being prepared is key to ensuring safety. Knowing basic Japanese phrases for emergencies can significantly affect how effectively you navigate and resolve these incidents. Whether traveling or living in Japan, investing time in learning these phrases and understanding the local emergency procedures can provide peace of mind and potentially save lives.
Learn Japanese Conversation for Daily Life At Coto Academy
Need to learn survival phrases, from how to navigate emergencies to how to get by in day-to-day life in Japan? Join Coto Academy, where our conversation courses will prepare you for every daily facet of life in Japan! Our courses provide an immersive, supportive environment for you to pick up practical Japanese language skills, including reading, writing, kanji, and of course, conversation! So, visit our campus in Tokyo or Yokohama, or join us online from anywhere around the world! Ready to sign up or just want a casual (and free) chat to discuss more details? Simply fill out the short form below!
FAQ:
What number do I call in an emergency in Japan?
Dial 110 for the police and 119 for an ambulance or fire. Both are free to call, and operators can connect you to interpreter services if you don’t speak Japanese.
What’s the most important phrase to know in an emergency?
助けてください (tasukete kudasai), meaning “please help me.” It works in almost any emergency, whether you’re injured, in danger, or need immediate assistance.
How do I ask for an ambulance in Japanese?
Say 救急車を呼んでください (kyuukyuusha o yonde kudasai), meaning “please call an ambulance.” If you’re in a shop, station, or hotel, asking the staff to call is often easiest since they know the exact address.
What should I do if my wallet or phone is stolen in Japan?
Head to the nearest 交番 (kouban), or police box, and say 財布を盗まれました (saifu o nusumaremashita), meaning “my wallet was stolen.” You can swap in other items like スマホ (smartphone) or パスポート (passport).
What does 地震です (jishin desu) mean when my phone alarm goes off?
It means “there’s an earthquake.” The alert is sent by Japan’s Earthquake Early Warning system a few moments before shaking begins, so it’s your cue to find a safe spot away from anything that could fall.
If you are a resident in Japan planning to renew your visa or change your status of residence anytime soon, there’s a change coming that’s worth noting.
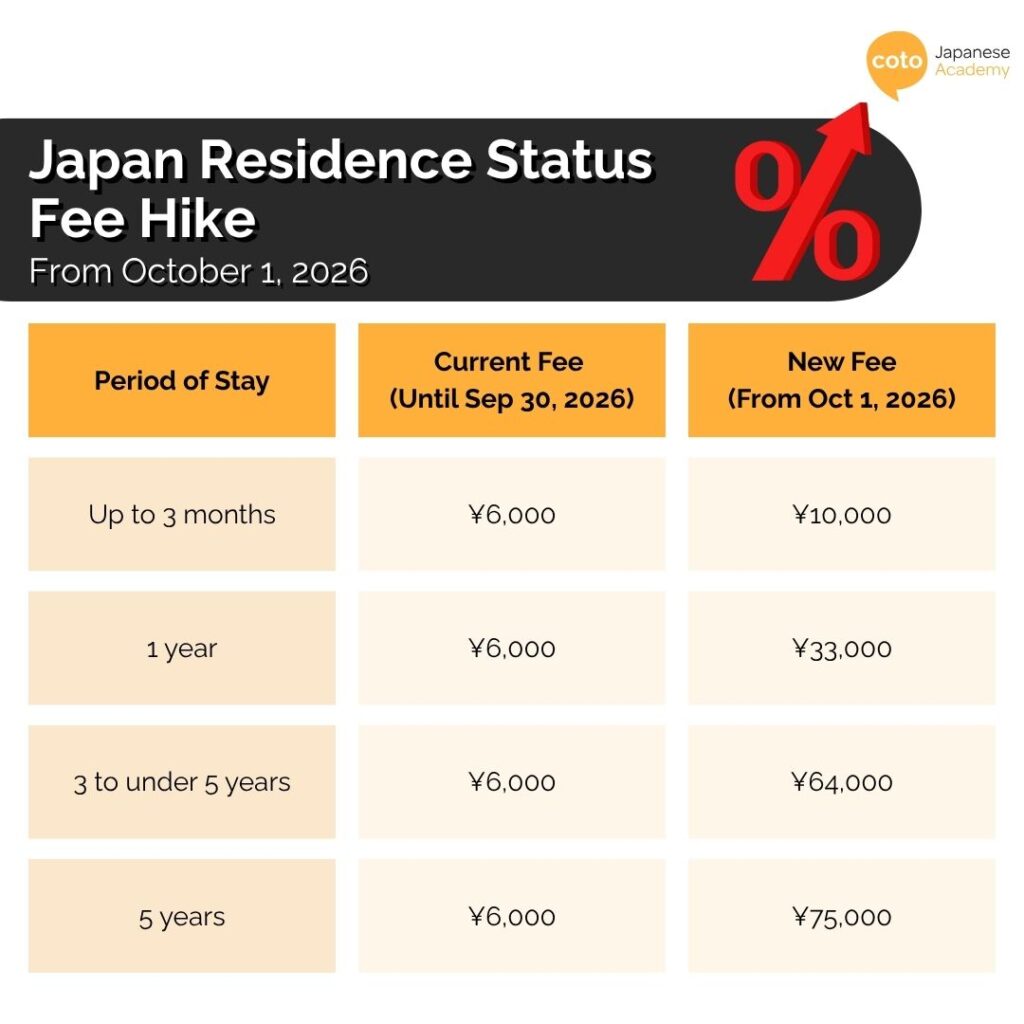
On Tuesday, August 25, 2026, the Japanese government decided to raise fees for foreign nationals who renew or change their status of residence in Japan. The renewal fee will rise to up to ¥75,000 from a uniform ¥6,000, effective October 1, 2026. The Cabinet approved the move, in line with a revision to the Immigration Control Act.
Japanese immigration policies change frequently. We recommend referring to the official Immigration Services Agency of Japan under the Ministry of Justice for the most up-to-date information.
Updated Fee for Application for Extension of Period of Stay and Change of Status of Residence in Japan
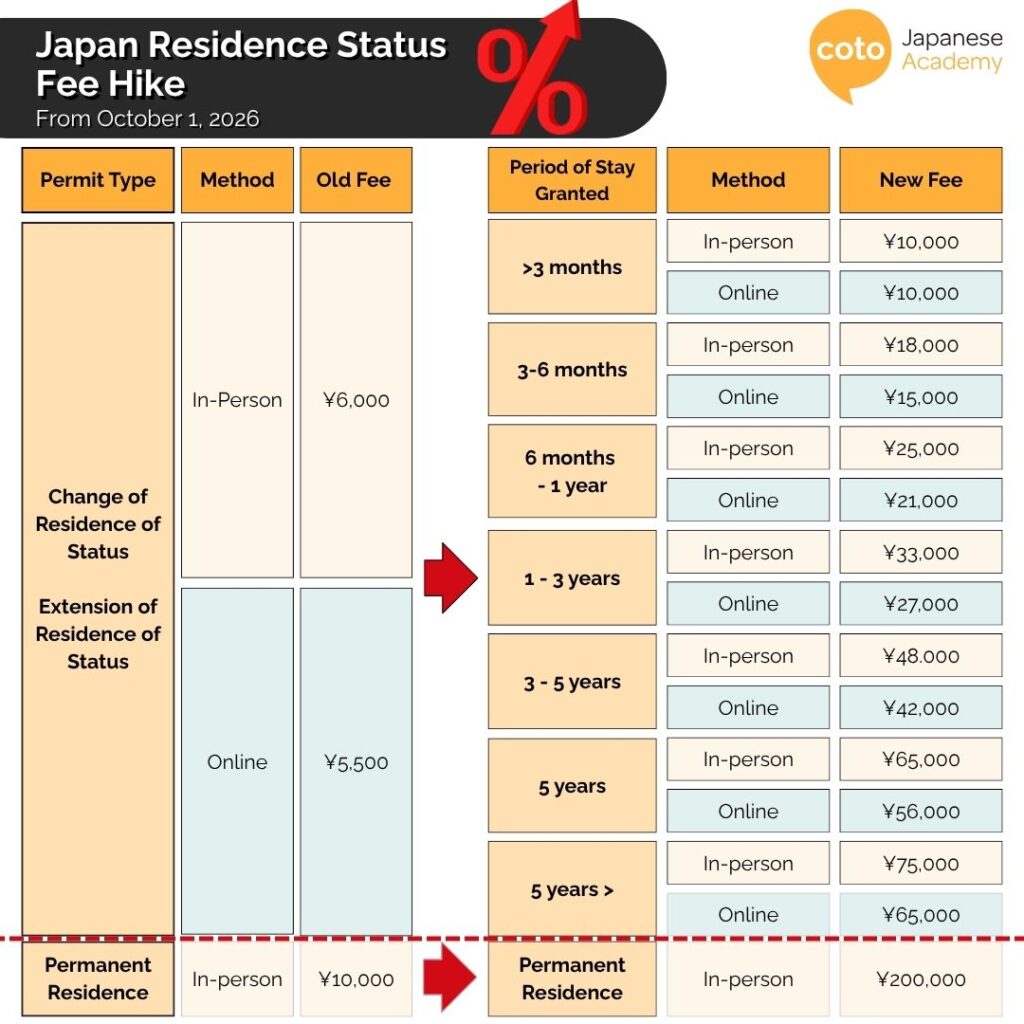
Until September 30, 2026, the fees for extending a period of stay or changing a status of residence remain a flat rate of ¥6,000 for in-person counter applications and ¥5,500 for online submissions, regardless of the duration granted. Foreign residents can typically be granted periods of stay ranging from 3 months to 5 years.
Starting October 1, 2026, Japan is replacing this flat-rate system with a tiered pricing model based on the duration of stay granted, reaching up to ¥75,000 for periods exceeding five years. The government is introducing a significantly reduced fee for applicants who apply online. Those who submit their application digitally can save up to ¥10,000 compared to filing in person at their local immigration bureau.
Old Fee Schedule (Prior to October 1, 2026)
Application Type
Submission Method
Standard Fee
Change or Extension of Status
In-Person (Counter)
¥6,000
Change or Extension of Status
Online Application
¥5,500
Permanent Residence
In-Person (Counter)
¥10,000
New Fee Schedule (Effective October 1, 2026)
Permit Type
Period of Stay Granted
In-Person Fee
Online Fee
Change or Extension of Residence Status
Up to 3 months
¥10,000
¥10,000
3 – 6 months
¥18,000
¥15,000
6 months – 1 year
¥25,000
¥21,000
1 – 3 years
¥33,000
¥27,000
3 – 5 years
¥48,000
¥42,000
5 years
¥65,000
¥56,000
Over 5 years
¥75,000
¥65,000
Permanent Residence
Permanent
¥200,000
N/A
Under the new policy, fees scale substantially based on the period granted: short stays under three months are priced at ¥10,000 (both in-person and online), stays between three and six months cost ¥18,000 in person or ¥15,000 online, and six-month to one-year extensions rise to ¥25,000 in person or ¥21,000 online. For longer durations, a one- to three-year permit requires ¥33,000 in person or ¥27,000 online, a three- to five-year permit costs ¥48,000 in person or ¥42,000 online, five-year permits cost ¥65,000 in person or ¥56,000 online, and extensions exceeding five years reach up to ¥75,000 in person or ¥65,000 online.
Permanent Residence applications will see the most dramatic increase, surging twentyfold from a flat ¥10,000 to ¥200,000
This comes as part of a broader line of immigration policy changes, including the new requirement to prove Japanese language ability for the most common professional working visa, tightened requirements around applying for permanent residence, and increased fees across other types of temporary visas.
Simplified breakdown of the new fee for the residence permit application in Japan. Data taken from the official Ministry of Justice website.
Fee Reductions for Specific Applicants
To support vulnerable applicants facing severe financial hardship—including designated refugees—the Immigration Services Agency is providing reduced fee caps of ¥10,000 for temporary stay extensions and ¥20,000 for Permanent Residence applications.
The Immigration Services Agency’s reduced fee is allowed for people who meet two conditions: financial hardship equivalent to public assistance welfare levels, and a need for humanitarian consideration.
Now, the scope has since expanded to include:
Foreign nationals who single-handedly raise the biological children of Japanese nationals or special permanent foreign residents
Cases where denying residency would be considered inhumane
Fee-reduction requests must be filed in person, as the online system cannot process discount claims.
How to Pay for Your Residence Permit Application
With this drastic fee increase, the Immigration Services Agency of Japan has also provided some recommendations regarding the purchase of revenue stamps
Paying for In-Person Applications with Revenue Stamp
If you are applying directly at an immigration counter, you will continue paying your fees using standard revenue stamps (shunyu inshi) with cash. However, because the new tiered fee model varies based on the exact period of stay you are granted, on-site convenience stores at local immigration offices may quickly run out of specific stamp denominations.
To save time and avoid long lines, the Japanese government explicitly recommends that you check the approved duration listed on your official notification postcard, go to a post office beforehand to buy the exact stamp amount required, and bring the minimum number of stamps needed to your final appointment.
Paying for Online Applications
Applying through the Online Residence Application System eliminates the need for revenue stamps altogether. Under revised regulations, online payments are now managed by a designated third-party payment vendor.
Once your application is approved, you can complete your payment at a local convenience store register, through standard bank transfers, or via internet banking for a completely cashless experience. Keep in mind that a small third-party processing fee might apply to digital transactions.
Is the New Fee Based on When I Apply or When I Pay?
The revised fee structure is determined entirely by when you apply (the official application acceptance date), not when your permit is granted or paid for.
The new fees apply strictly to foreign nationals who submit their application for an extension of stay, change of status, or permanent residency on or after October 1, 2026.
This means that if the Immigration Services Agency officially accepts your application on or before September 30, 2026, the old fee will apply. For example, you will pay ¥6,000 for an extension or change of status of residence, or ¥10,000 for an application for permanent residence, even if your application is approved after October 1, 2026.
Because of this rule, immigration offices are expected to see a massive surge in applicants during the last few weeks of September. If your visa renewal or status change window falls around this time, it is strongly recommended that you prepare your documents early and apply a few weeks before the October 1 cutoff date!
How Does This Compare to Other Countries
Even after the increase, Japan’s fees remain on the lower end globally for a work-visa change of status or extension.
For example, extending a Skilled Worker visa from inside the United Kingdom, depending on length, ranges from £885–£1,751. This is separate from the annual healthcare surcharge of around £1,035/year. A standard H-1B visa in the United States costs between $2,225 and $3,500 in base government fees, though new proposals from the Department of Homeland Security include a major $103,265 supplemental fee for new applicants.
Which Visa Types Are Affected?
The fee change applies broadly to Change of Status of Residence and Extension of Period of Stay applications, meaning it covers essentially every status of residence category, not just work visas. The fee is based on the length of the new period of stay.
Some visa that falls under this price hike include:
Work visas, including the Engineer/Specialist in Humanities/International Services. Other work categories (Specified Skilled Worker, Instructor, Business Manager) are included.
Spouse visas
Dependent visas
Student visas
Any other status of residence
Permanent Residency is the exception, with the application fee increasing separately from ¥10,000 to ¥200,000.
What You Can Do
If your residence status expires around October 1, consider applying for an extension earlier. You can generally apply for an extension of your period of stay up to three months before your expiration date, so you may be able to submit your application as early as July.
For those planning to take the JLPT in Japan, registration for the December 2026 test has officially closed, well ahead of schedule. Registration was originally set to run from August 24 to September 7, but demand pushed every level to full capacity early. N1 and N2 closed on August 31, while N3, N4, and N5 closed even sooner, on August 27, just days after registration opened. JEES, the administrator of the JLPT, has announced a second registration window for N3 only, opening September 2 at 10:00 AM JST, for Tokyo and Osaka test centers. N1 and N2 will not be reopening.
‘Are you planning to take the JLPT and wondering how you can apply online in Japan? You are in the right place. This blog will be a thorough guide on how to apply for the JLPT if you are planning to take the test in Japan, step by step.
Important: Starting 2026, only residents of Japan can take the JLPT in Japan. Tourists and short-term visitors are no longer eligible. You will also need to present your valid ID as proof of your address in Japan, most commonly the Residence Card.
Now, let’s go through how to register for the JLPT in Japan and the key details you should know before signing up!
When is The 2026 JLPT test?
The JLPT in Japan is held twice a year: in July and in December. For 2026, the first JLPT will be held on Sunday, July 5, 2026, and the second JLPT will be held on Sunday, December 6, 2026. This frequency might vary if you are taking the JLPT outside. Either way, these tests are usually held on the first Sunday of July and December.
First JLPT Test in 2026: First week of July
Second JLPT Test in 2026: First week of December
In 2027, you can also expect the tests to take place around early July and early December. Registration usually opens a few months before each test, with exact dates varying depending on your location. It’s best to check the official JLPT website or your local test center for the most accurate information as the dates approach.
When is The Registration Period for The 2026 JLPT?
Registration for the JLPT takes place a few months before the actual test date. The registration for the December JLPT 2026 begins from Monday, August 24 to Monday, September 7, at 5 pm JST. An important thing to note is that recently, JLPT registrations have been at capacity. If you have decided to register, we recommend you doing the first or second day of the registration period!
Tourists and Short-term Visitors Are no Longer Allowed to Take the JLPT in Japan
Starting in 2026, Japan no longer allow tourists or short-term visitors to take the JLPT in Japan. Moving forward, the Japanese administration will require proof of residency and for applicants to input their residence card (在留カード, zairyuu card) number.
According to the announcement, “The 2026 JLPT is primarily intended for non-native Japanese speakers who are mid-to-long-term residents or special permanent residents.”
People in certain visa categories can apply for the JLPT in Japan, but with a few conditions.
Non-native Japanese speakers who have Japanese nationality
People with permission for provisional stay (residence and contact information must be properly verified)
Those under the Japan–U.S. Status of Forces Agreement or the UN Forces Agreement
Diplomats
Officials
However, if you fall into any of these categories, you’ll need to declare your status during the application process. You may also be asked to provide identification documents, such as your passport, to confirm your nationality or visa status.
According to JEES, this decision comes after a large number of overseas applicants who use invalid phone numbers and contact information, which leads to problems in delivering physical documents, such as the test voucher or score reports, when the JLPT results are out. Because of this, when you are applying online via the MyJLPT portal, you will now have to provide your residence card number and its expiration date.
Where Is The JLPT Held?
You have two options: take the test locally in Japan (only available if you hold a valid Japanese residence card) or in an educational institute overseas. The JLPT is hosted in local institutions in most Southeast Asian countries, North America, Europe, Latin America, the Middle East, Africa, Oceania, and South Asia. However, the frequency of the JLPT might vary, with some hosting the JLPT twice a year and others only once a year. For the full and comprehensive list of overseas institutes that conduct JLPT, head down to the link over here to check if it is an approved institute.
As the location in which you take the JLPT varies, there may be different procedures, windows, or deadlines that you have to take note of. However, the test date still remains the same. For more information on how you would go about applying for the JLPT online or otherwise, please click on any one of the links below:
Looking at the test components, JLPT Test Levels N1 to N3 are composed of 3 Components: Reading (60 marks), Vocabulary (60 marks), and Listening (60 marks). As for JLPT Test Levels N4 to N5, there are 2 Components: Japanese Language Knowledge (120 marks) and Listening (60 marks).
If you are unsure of how to prepare for JLPT N2 or N3, click on the links and it will lead you to a guide we came up with some time back!
However, in order to pass, you need to meet 2 conditions:
Score at least 19 marks for any sections with 60 marks obtainable and 38 marks for sections with 120 marks obtainable.
Meet the overall passing grade for the test at each level. Here’s a list of the passing marks:
JLPT Level
Vocabulary/ Grammar)
Reading
Listening
Total Score
N1
19
19
19
100
N2
19
19
19
90
N3
19
19
19
95
JLPT Level
Vocabulary/ Grammar and Reading
Listening
Total Score
N4
38
19
90
N5
38
19
80
Overview of How to Apply For The JLPT in Japan
Applying the JLPT online requires two big steps: creating your MyJLPT account and applying for the JLPT level you want to take. Before you start, make sure you have already prepared your passport-style photo and residential address in Japan (note that now, you cannot use hotel addresses).
At this point, you should also have already decided which area you want to take the JLPT in. The exact location is typically provided when they mail you your exam voucher, but keep in mind that test venues differ between levels, even within the same area. For example, if you’re taking the JLPT N2 and your friend is taking the JLPT N4, don’t expect to go to the same facility (though there may be cases where you do).
Part 1: Create Your MyJLPT Account
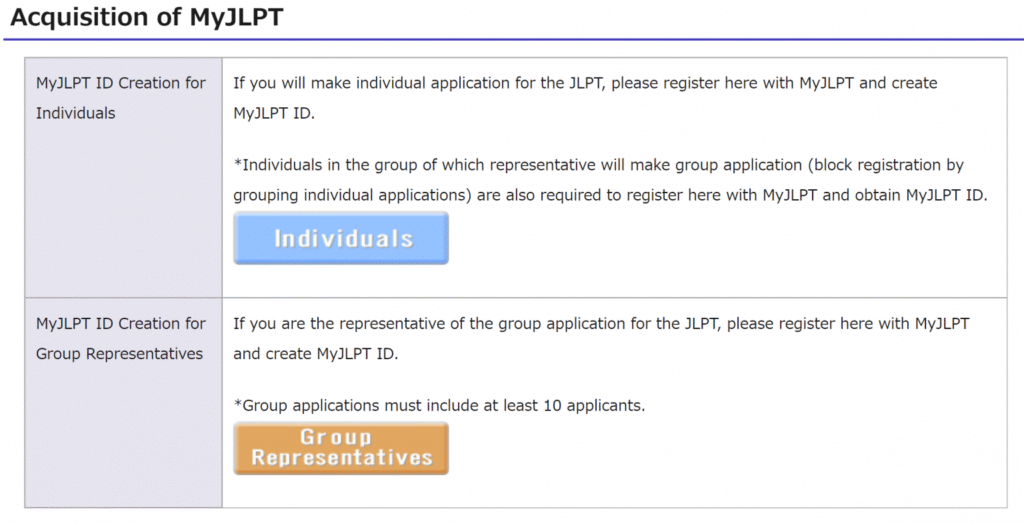
MyJLPT is a website for people who want to take the Japanese-Language Proficiency Test (JLPT) in Japan. On MyJLPT, you can apply for the test, check your test results, and request a Certificate of Result and Scores online. The website is managed and operated by Japan Educational Exchanges and Services (JEES). Visit this page to start creating your MyJLPT account.
Typically, for most of us, we want to apply for the JLPT as individuals.
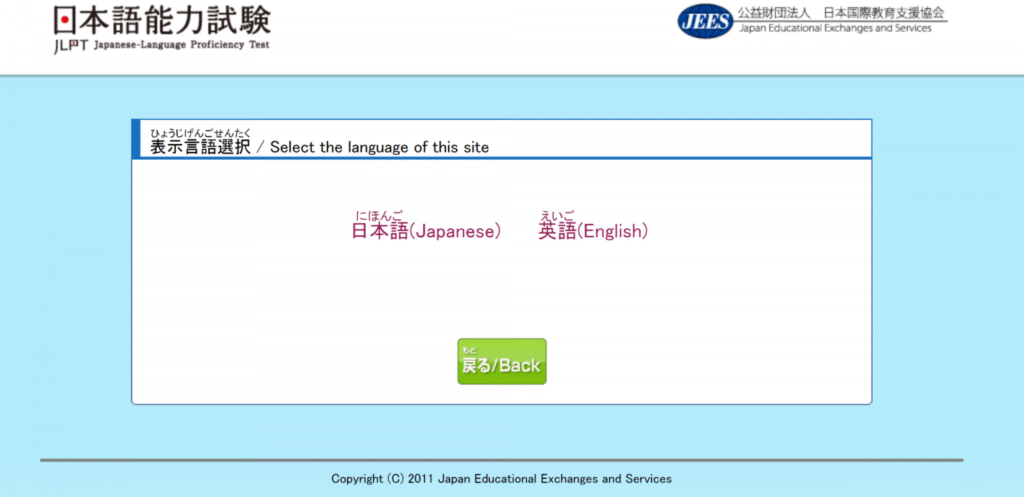
To reduce misunderstanding, we highly recommend selecting English for the language setting.
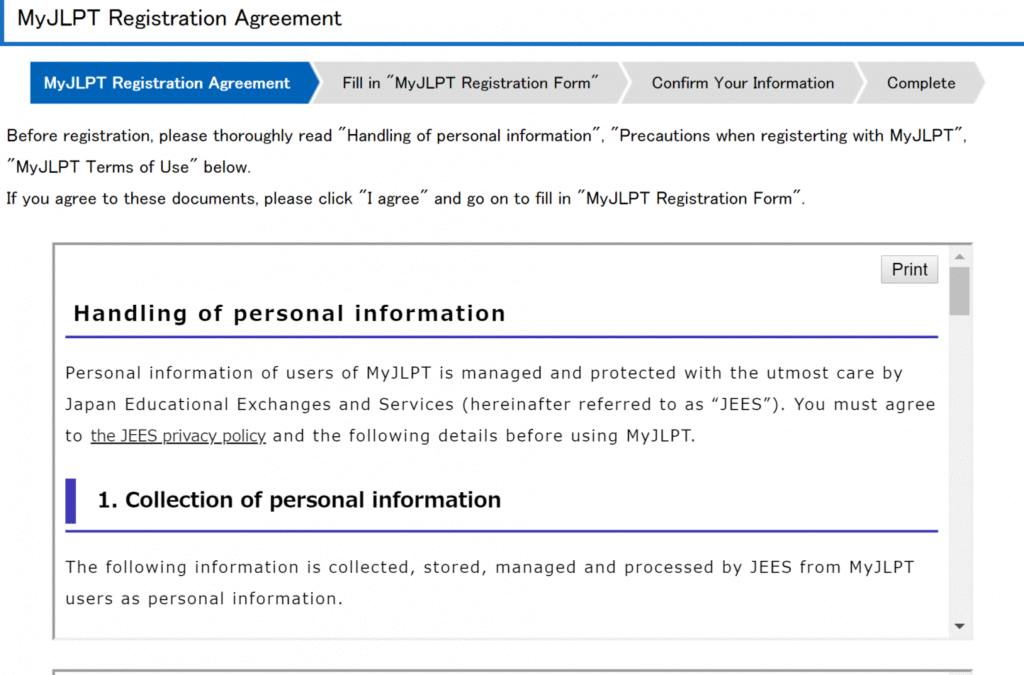
Once you click on your desired language, the site will take you to a long registration agreement. This lists everything from how they handle personal information to the exact eligibility of those who will be able to use MyJLPT.
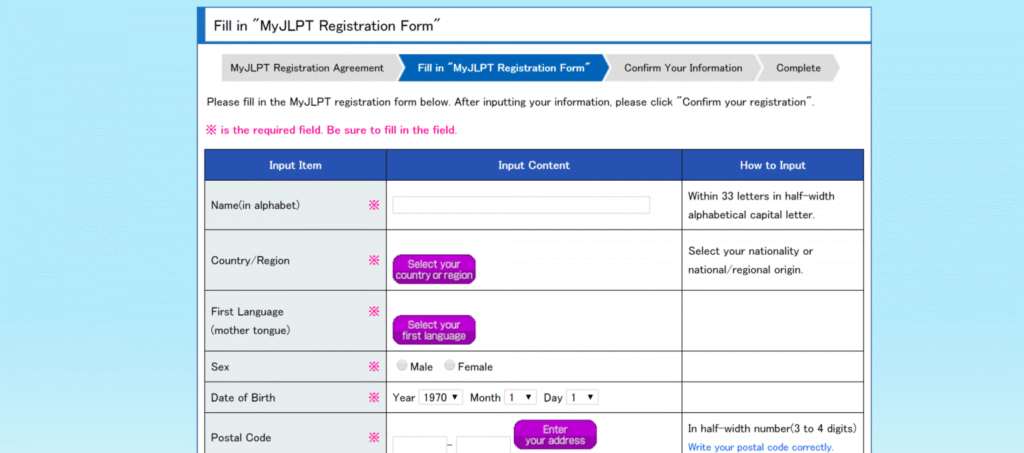
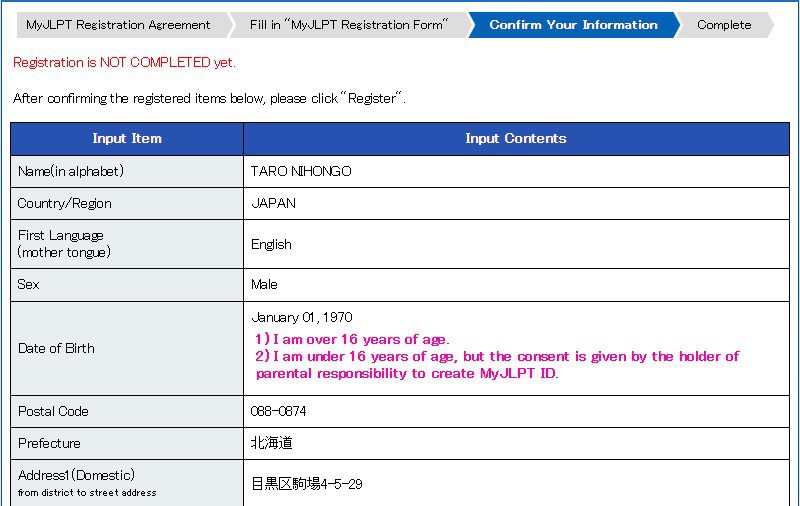
Next, you will fill out all of your personal information. Make sure your name and address match the current address on your residence card, as well as your date of birth. Do not lie. Your information is often used for cross-checking on the day of the test.
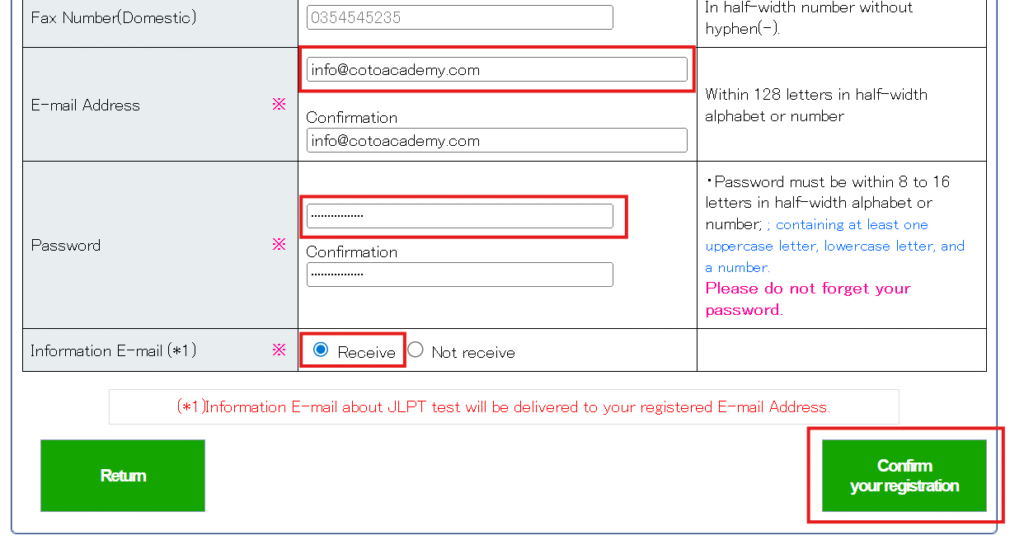
At the bottom of the page, you will set your email and password. Do not forget this information, as it will be used the next time you log in to your MyJLPT page to check your past scores and JLPT records. Finally, we highly recommend that you opt to receive information emails from the JLPT! This will allow them to send you notifications regarding the test. The JLPT administrator does not send a lot of marketing emails, so you will not get spammed!
Finally, confirm your personal information and check your email inbox for a confirmation email. They will give you your new MyJLPT ID, which you’ll use to log into your MyJLPT account. Try not to lose your MyJLPT ID. It’s not a username you set yourself, so it can be hard to remember, and we’ve seen a lot of people end up not saving it (although you can always recover it).
Part 2: Registering for the JLPT Online with your MyJLPT Account
Once you have obtained the MyJLPT ID, you will be asked to complete the online application from your MyJLPT page. You can log back in by going to the official JLPT in Japan website once again. The website itself is more friendly to certain web browsers, and the site recommends that you use Microsoft Edge.
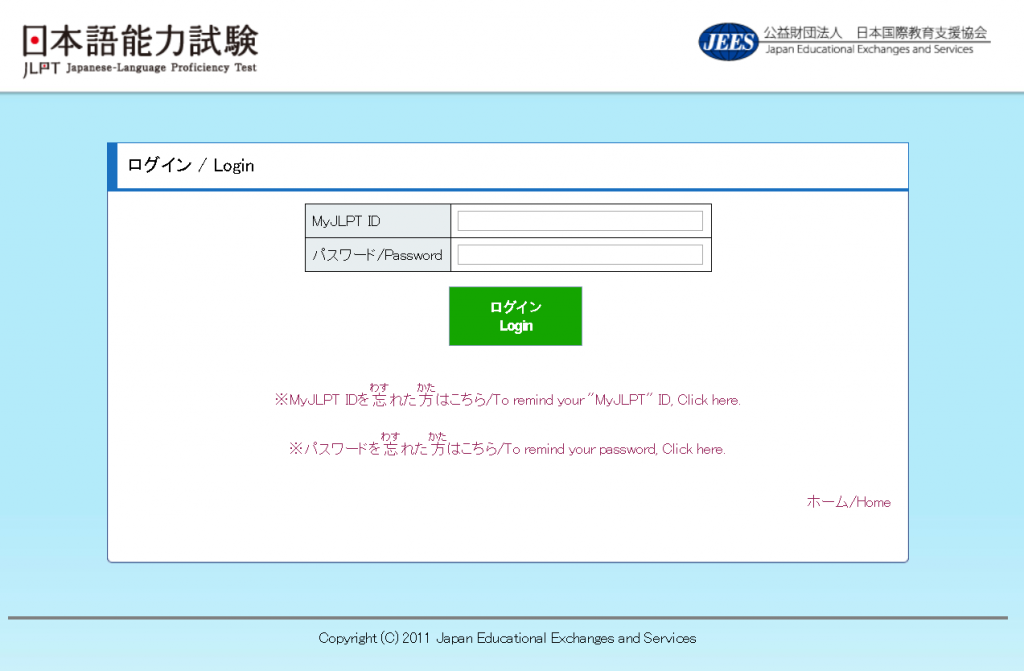
Step 1: Log in to your My JLPT account
First, try to log in to your MyJLPT account. Input your ID (which should be sent to your inbox the moment you finished registration) and the password you set.
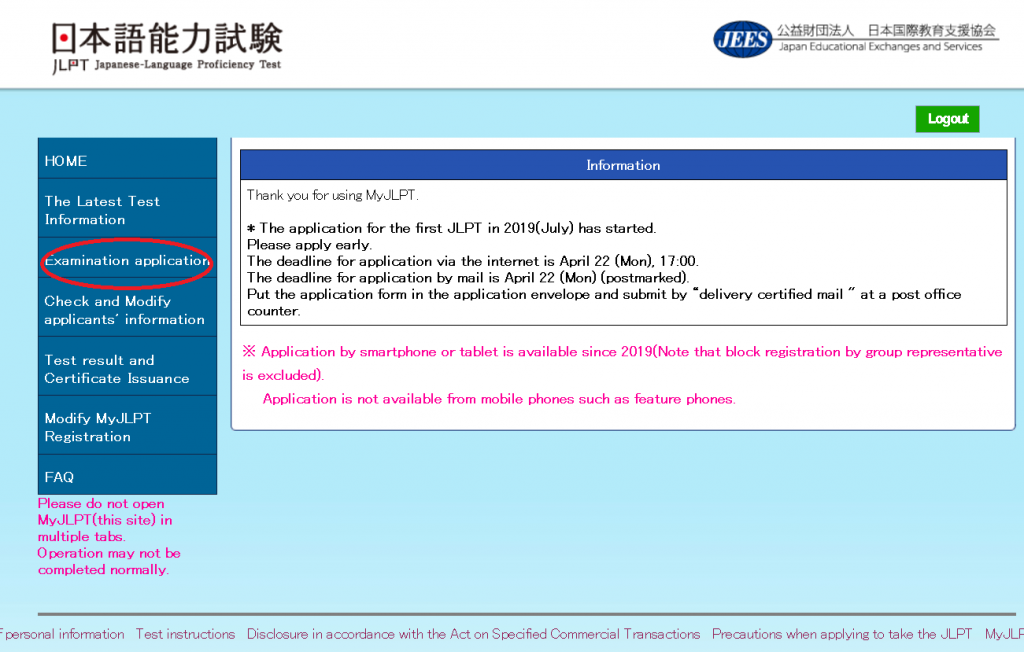
Step 2: Click on “Examination application”
Before you start your application, there’s one important thing to keep in mind!
When you log in to your MyJLPT account, you will only see the test that is currently within the official application period. If the application window is not open yet, the test simply will not appear.
For example, if you log in on March 1, hoping to apply for the July 2026 JLPT, you may not see anything available. Don’t panic! This just means the application period hasn’t started yet. The system will let you know that it is not currently accepting applications.
The best thing to do is check the official announcement dates and come back during the designated application period. Once it opens, you’ll be able to complete your registration without any issues.
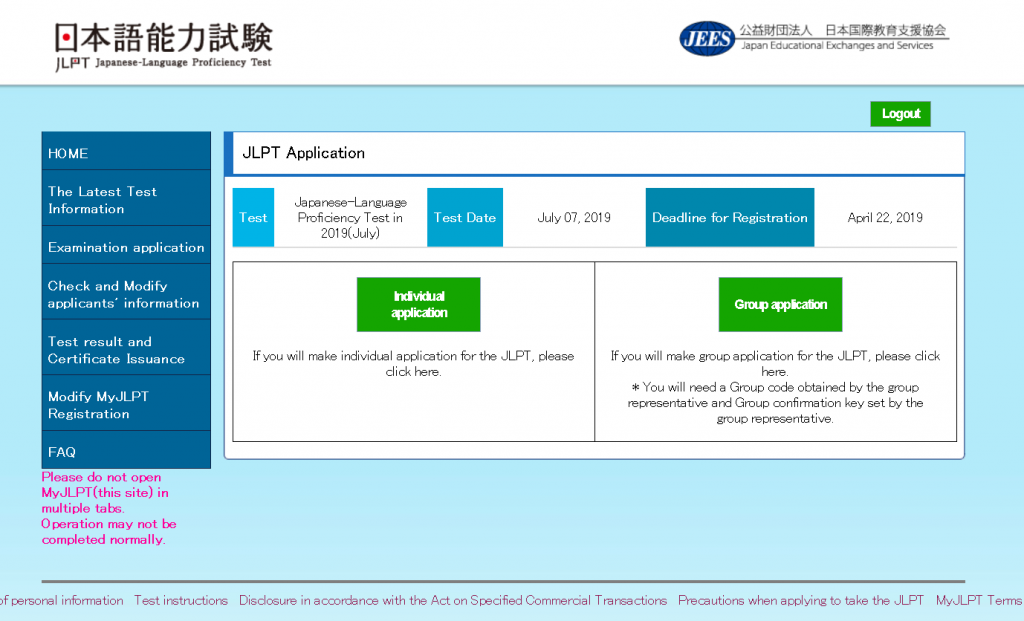
Step 3: Choose your application type
Most of us will apply for the JLPT involuntarily, so select “Individual application”.
Step 4: Sign the agreement to the privacy policy
Next, you’ll be directed to the privacy policy and some important rules. It may look like one of those long pages that make you want to skip reading, but there are a few important things you should know.
For example, the JLPT application fee is not refundable once you have paid it, even if you later decide to cancel your application.
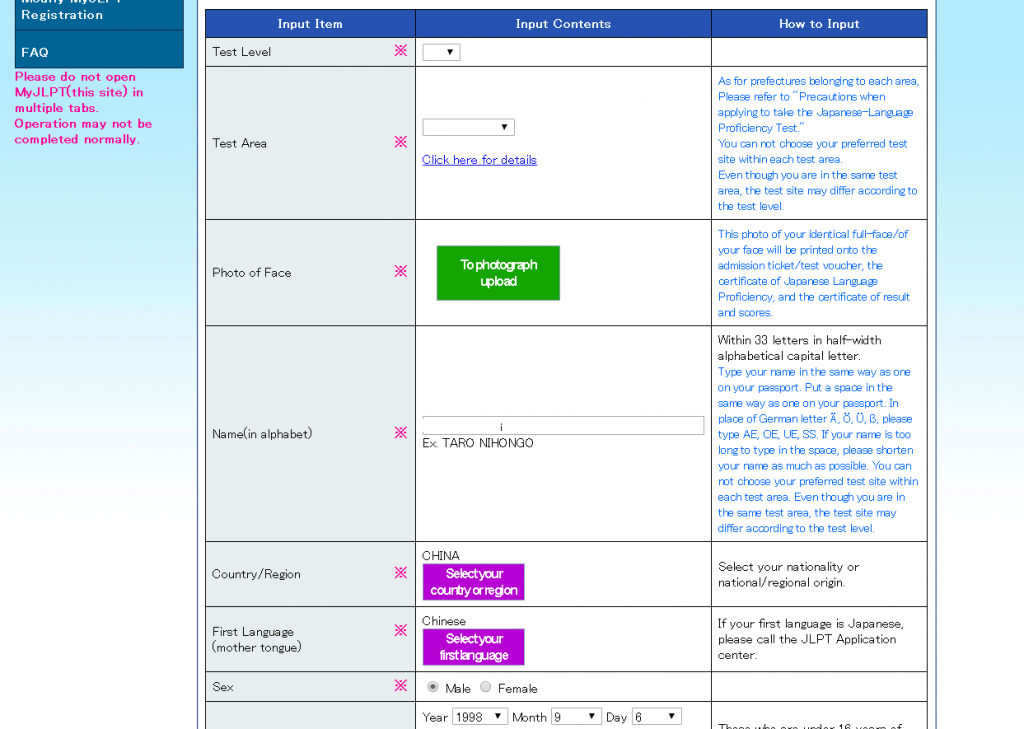
Step 5: Choose your level and fill in the other details required
This is the part where you should double-check everything carefully, especially the city where you want to take the JLPT and the test level you are applying for. Make sure all your information is correct before you move on.
You will also need to upload a clear, full-face passport-style photo. This photo will be used as identification and will appear on your admission ticket, test voucher (which you must bring to the JLPT test center), and your Certificate of Result and Scores. So choose a proper photo that clearly shows your face.
Tip: If you enter the wrong JLPT level or the test area, you can still change your test level or test location during the application period. Just make sure you do it before the deadline, because no changes are allowed after that!
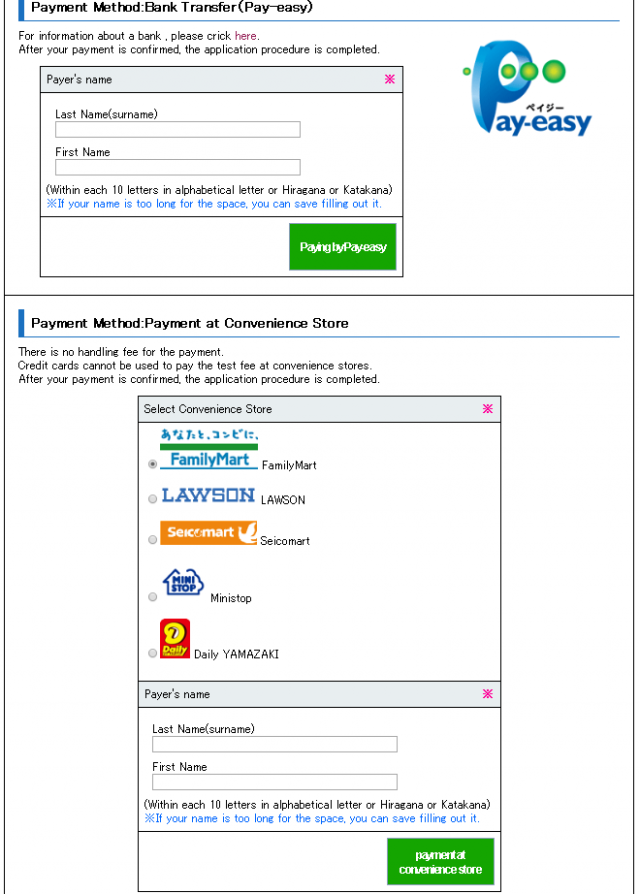
Step 6: Choose Payment Type
If you are in Japan, you can pay the test fee through several payment methods: credit card, bank transfer, or payment via the convenience store. Please confirm the available payment methods for countries outside Japan. Generally, a credit card is acceptable.
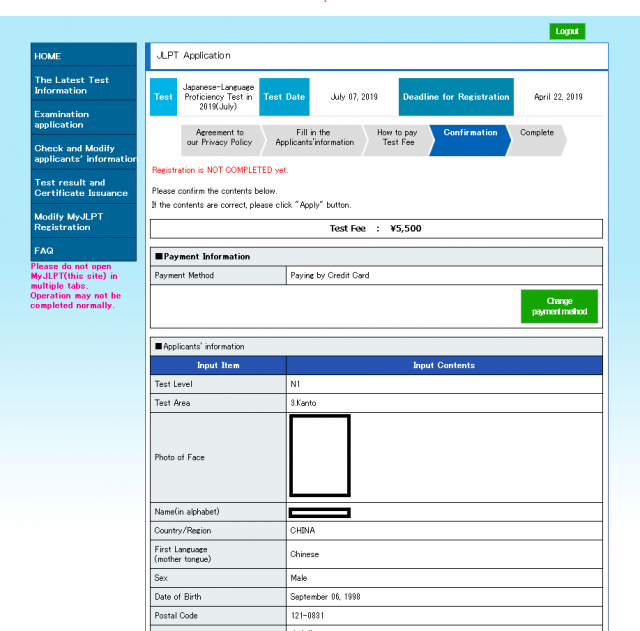
Step 7: Confirm your information
Final step: The application will be completed after confirmation of your information
How Much Does the JLPT Exam Cost?
As of 2025, the JLPT in Japan costs around ¥7,500 in Japan. After completing your application, you must complete payment before your registration will be confirmed.
Test fees may vary based on the location in which you decide to take the test, and can be more expensive overseas. For example, in the USA and Canada, the test fee is around $100.
If you are in Japan, the payment options for the JLPT range from online with a credit card to cash at a convenience store or post office. If you are outside of Japan, the payment method will depend on the test location. From January 17, 2022, a separate fee of 110 yen will be required for a cash payment from a Japan Post Bank ATM. For group applications, a fee of 110 yen will be required for each “payment number”.
The test payment window for December is from early to late September. After making payment, you will be set to receive a Test Voucher, which you will need to bring to your test venue to confirm and verify your status as a participant of the JLPT you have signed up for. Ensure that this slip of paper is well-kept and not lost, as it is very important. With these, remember to bring in some form of identification together with your Test Voucher. With that, take the test, and you’re all good to go.
When Will I Get My JLPT Results?
After all that hard work, just sit back, relax, and give yourself a well-deserved break. Until the time comes, enjoy yourself! But until when? Well, the release of results can vary based on whether you’ve taken the test locally or from an overseas educational institute, but here are some dates you can stay on the lookout for!
Local July Test: Early September
Local December Test: Early February
Overseas July Test: Early October
Overseas December Test: Early March
Note: For Overseas Students, collect your Score Reports and hopefully, a Certificate of Proficiency, at your Local Host Institute. As for Local Students, the Score Reports and Certificates will be mailed to you directly based on the address associated with your MyJLPT Account.
If you have questions about our school or taking JLPT Prep lessons with us, don’t worry. Here’s a link to the FAQ site where you can check to see if it answers any queries you have. With that, we would like to wish you all the best and happy studying!
Start taking Japanese lessons and pass the JLPT exam!
Double your chances of passing the test with Coto Academy’s JLPT Prep Course! Our 3-month, semi-intensive course meets every Saturday for 3 hours, covering everything from high-frequency kanji to the specific logic needed to ace the reading section. Whether you join us in-person in Tokyo or via our online classrooms, you’ll get the expert strategy and peer support needed to walk into the exam with confidence. Seats are limited to keep class sizes small and effective—secure your spot today, and let’s reach your goal together.
Comprehensive Coverage: 3 hours per class covering vocabulary, kanji, grammar, and specialized reading strategies.
Expert Guidance: Small class sizes with instructors who know exactly where students usually stumble.
Flexible Learning: Join us in-person at our Tokyo campus every Saturday, or join from anywhere in the world via our Online sessions.
When is the next JLPT in 2026 and when can I sign up?
For 2026, the first JLPT will be held on Sunday, July 5, 2026, and the second JLPT will be held on Sunday, December 6, 2026.
Where do I apply for the JLPT?
To apply, you will need a MyJLPT account, which you can sign up for here. Once you have an account, you can sign in with your account and start to register.
When do the JLPT results come out?
Depending on when you take the test, the release of the results can differ. In general, you will get your results 2-3 months after the test. Here is when you should look out for your results, depending on when you take the test!
Local July Test: Early September
Local December Test: Early February
Overseas July Test: Early October
Overseas December Test: Early March
I have a question about the JLPT that isn't addressed here. What do I do?
If you have any JLPT-related inquiries, you can visit the JLPT FAQ site. Your answer should be there.
When is JLPT 2026?
The JLPT is held twice a year, typically in July and December. In 2026, you can expect the tests to take place around early July and early December. Registration usually opens a few months before each test, with exact dates varying depending on your location. It’s best to check the official JLPT website or your local test center for the most accurate information as the dates approach.